Tag Archives: cake

Coffee & cake…the perfect Union!

Last week I was invited to attend Taste of London by Union Hand-Roasted Coffee. It’s no secret that I’m a complete coffee (not to mention good food) addict…so I obviously jumped at the chance! I turned up wearing extremely unsuitable footwear, having just left my umbrella on the bus on what was one of the greyest, most miserable, rainy, English summer days ever! However we didn’t let the rain stop play and instead we did what any true Brit would do…donned a fetching poncho and braved the weather in search of some tasty morsels…and amazing coffee of course!

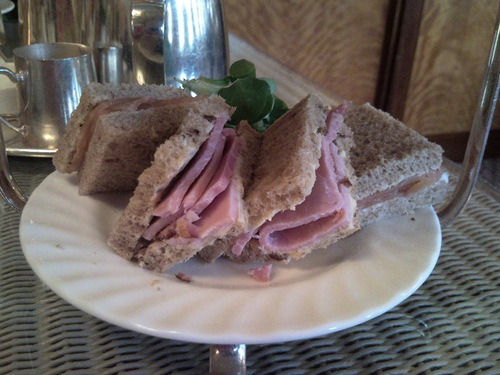
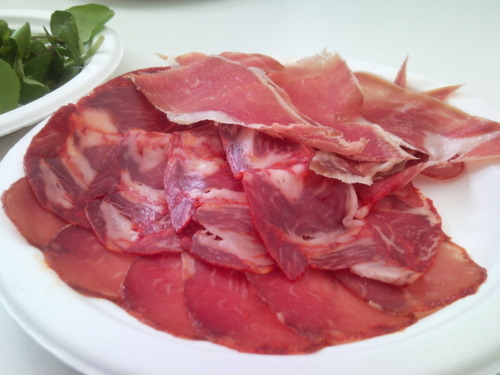
First stop was the Barrafina, Fino and Quo Vadis stands where we sampled these delicious dishes…


After which we were led to the Union stand where Jeremy (pictured below) talked us through some of the latest Union coffee varieties. I love people who are enthusiastic about their subject matter and Jeremy’s passion for coffee was totally infectious…I dare say he could have lured even a non-coffee drinker over to the dark side of caffeine consumption


He talked about the fact that we need to make people realise that coffee isn’t JUST coffee! There are so many varieties and brewing methods, which all produce very different tastes and experiences. There is no right or wrong opinion when it comes to drinking coffee and  everyone will have their own preference….it’s more about feeling able to express that preference and building your own vocabulary to describe what you like…coffee drinkers liberation if you will!

We then tried some La Esperanza Geisha from Colombia prepared in a syphon, very reminiscent of school science classes…


Then Rwandan abahuzamugambi ba kawa ‘exceptional lot’ maraba, prepared in a pour over…


And their Gajah mountain, Aceh, Sumatran coffee, which packed a real punch, prepared in an Aeropress…


I was in total coffee heaven and the lovely Union guys, packed me off with enough coffee to keep me awake for days!


I headed off for a wander around the rest of the festival, sampled a dish of slow cooked lamb with buttered potato and caramelised onion gravy from The Rhodes 24 stand…

And even bumped (not literally) into Marcus Wareing…


Now, I’m a bit of a recipe hoarder and have recently started taking photos of recipes that catch my eye on my phone; sometimes they’re from magazines or sometimes from friends cook books. I don’t even remember where some of them are from but they’re stored away until the perfect baking occasion presents itself! On my way home from Taste I remembered one such recipe that I’d stashed away a few weeks ago…the perfect opportunity to use some delicious Union coffee…

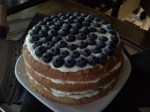
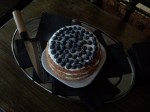
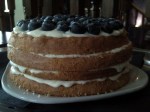
As soon as I got home I whipped up a coffee poppy seed cake…


To make it you’ll need…

100g poppy seed

80g sour cream

150g plain flour

1 tsp baking powder

1 tsp bicarbonate of soda

½ tsp ground cinnamon

Pinch of salt

150g butter, softened

250g caster sugar

3 eggs

1 tsp vanilla extract

40ml espresso

You need to do a tiny bit of advance prep before you can make this cake by stirring the poppy seeds into the sour cream and leaving them to ‘soak’ for at least 2 hours (or overnight if you have time).

Heat the oven to 170 degrees and line a 20cm or 22cm tin with baking paper.

Sift the flour, baking powder, bicarbonate of soda, cinnamon and salt into a bowl and set aside for later.

In another bowl, cream together the butter and sugar until light and fluffy. Add the eggs one at a time; adding a spoonful of the flour mixture after each egg so that the cake batter doesn’t curdle. Mix in the vanilla extract and espresso. Finally fold in the remaining flour mixture, alternating with the sour cream and poppy seeds. Stir until just combined but try not to overmix.

Pour the cake mixture into your prepared tin, smooth the top and bake for 35-40 minutes. If you’re using a 20cm tin it may need an extra 5 minutes of so as the cake will be deeper but test it after 40 mins by inserting a skewer into the centre…if it comes out clean it’s ready!

Leave it to cool in the tin for a few minutes then turn it out onto a rack to cool completely before icing.

For the icing you need…

50ml espresso

125g icing sugar

Beat the espresso with the icing sugar until it’s smooth and lump free and simply pour it over the cake to create a gorgeous coffee glaze!

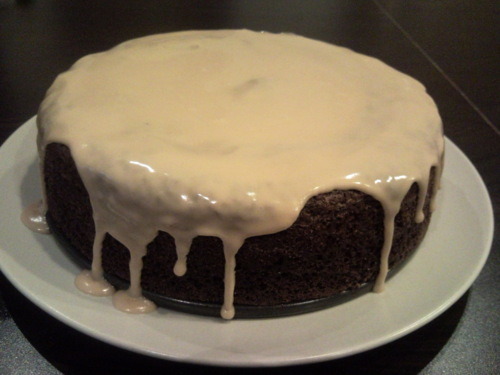
I don’t think I’ve ever tried a cake quite like it…deliciously unusual! The coffee gave the cake the most amazing richness and the poppy seeds added a great crunch! It was extremely moreish…the perfect accompaniment for a cup (or 3) of Union Hand-Roasted Coffee!


Leave a comment

Filed under Uncategorized

Wedding season is upon us…

The last 2 weekends have been devoted to matrimonial celebrations…a whirlwind of gorgeous dresses, buffets, booze, confetti and cakes, topped off with a healthy dose of air guitaring and shape throwing on the dancefloor 🙂

I realise that the standard protocol for wedding presents is to buy the happy couple something from their wedding list but…I don’t like to conform and instead decided that a home baked cake was a far better present! Once again I put my cake-transporting-on-London-buses skills to the test and somehow managed to get this little beauty all the way to Whetstone unscathed…

I was very proud of of the finished cake, although the perfectionist in me was a bit disappointed in the slight non-uniformity of the heart and…I was told by a guest that I wouldn’t cut it as a plasterer! the cheek! But it’s the thought that counts right? and whether it actually tastes any good (which it did!).

What you can’t see from the photo above is that beneath the layer of gorgeous cream cheese frosting is a triple layer red velvet cake….

I followed the Hummingbird Bakery recipe, which I’ve used previously to make these cupcakes.

To make an 8 inch cake you need…

120g unsalted butter

300g caster sugar

2 eggs

20g cocoa powder

40ml red food colouring (the recipe recommends Dr Oetker red food colouring but I used concentrated gel, which means you can use a lot less)

1tsp vanilla extract

240ml buttermilk

300g plain flour

1tsp salt

1tsp bicarbonate of soda

3tsp white wine vinegar (weird I know but stay with me here)

Preheat the oven to 170 degrees and line an 8 inch cake tin. I made do with 1 tin and sliced my cake into 3 but if you’re lucky enough to have 2 or 3 tins you can make the layers separately.

Put the butter and the sugar in a freestanding electric mixer or use a handheld version to beat them until light and fluffy. Add the eggs and mix on a lower speed until they are well incorporated.

In a separate bowl mix the cocoa powder, red food colouring and vanilla extract together to make a thick, gloopy, dark red paste. If you’re using the concentrated gel food colouring you only need about 1tsp but you may need to add a splash of water to make it into a paste.

Add your red gloop to the butter mixture and blitz it up until evenly coloured.

Pour in half of the buttermilk and mix at a slow speed, add half the flour and mix, then add the rest of the buttermilk and finally the remaining flour. Then give it one last mix just to make sure.

Finally, add the salt, bicarbonate of soda and vinegar (which creates an enjoyable fizz!) and mix it slowly into the cake batter for a couple of minutes.

Pour the finished mixture into your prepared tin(s) and put in the oven.

If you’re using 3 tins, bake for about 25 mins.

If you’re using 2 tins, pour a third of the mixture in one (this will need to cook for 25 mins) and two thirds of the mixture in the other (this will probably need a few minutes more approx 30/35).

If, like me, you’re lacking in the the tin department and are just using the one, you’ll need to cook it for about 50 minutes. I checked mine after 45 minutes but it was still very runny in the middle. You’ll know it’s ready when a knife or skewer inserted into the middle of the cake comes out clean.

Leave the cake to cool fully before icing it. To make the icing you will need…

600g icing sugar

100g unsalted butter (at room temperature)

250g cream cheese (cold)

Beat the icing sugar and butter together (this gets a tad messy) using either a freestanding or handheld electric mixer. The recipe says to beat it until the mixture comes together but I always lose patience and in an attempt to limit the amount of icing sugar wafting around my kitchen, I add the cream cheese pretty much straight away. I usually zap the butter in the microwave for 30 seconds first aswell, to make sure that it blends in well and that there aren’t any little lumps of butter left in the icing. Once all of your icing ingredients are incorporated, turn up the speed and beat well for about 5 minutes until smooth and creamy. Be careful not to overbeat it or it’ll become runny.

Use the icing to sandwich each of the 3 layers and to coat the top and sides of the cake. I use a metal spatula, which I dip in boiling water regularly…it makes smoothing the icing out a lot easier.

I think I may have gotten a bit carried away with the glittery sprinkles but I reckon the decoration fitted perfectly well with the brash, garish-ness of the bright red velvet sponge cake inside…

Who would’ve thought that a cake containing buttermilk and vinegar would work…but it does! and produces a gorgeously moist cake everytime!

Leave a comment

Filed under Uncategorized

I made this quadruple layer blueberry cheesecake gateau birthday cake for my friend Hannah and took it to her party in a bar near Tower Bridge. On looking out the window at the amazing view over the river and City Hall…I realised that I’d subconsciously recreated the iconic building in my slightly ramshackle cake construction 🙂 Well that’s my excuse and I’m sticking to it!

Leave a comment

08/05/2011 · 11:35 am

My Easter cardamom coffee mud (alternative wedding) cake

With the long weekend stretching ahead of me, I finally had time to do a bit of baking. I’ve got a vast collection of food magazines with post it notes sticking out of them marking ‘must bake’ items. A cake in a back issue of Olive magazine has been playing on my mind recently so the decision of what to bake for my family this Easter was a real no-brainer…the cake of choice…a very naughty looking cardamom coffee mud cake…

In my opinion you really can’t go wrong with a cake that contains strong cardamom infused coffee and no less than 600g of dark chocolate!

To make it you need…

12 cardamom pods, seeds removed and pods discarded

200ml strong coffee

200g dark chocolate

200g unsalted butter

3 eggs

80ml soured cream

400g golden caster sugar

170g plain flour

1tsp bicarbonate of soda

30g cocoa powder

Preheat the oven to 160 degrees. Grease and line a 23cm cake tin with greaseproof paper.

Lighty crush the cardamom seeds in a pestle and mortar before adding them to a saucepan with the strong coffee. Simmer this fragrant concoction for about 10 minutes until it has reduced down to 120ml.

Melt the chocolate and the butter and add in the reduced coffee and cardamom mixture.

Beat the eggs, soured cream and sugar together. Add this to the chocolatey, coffee goo and stir until combined.

Finally sift the flour, bicarbonate of soda and cocoa into the bowl and fold it in before pouring the complete mix into the prepared tin.

Bake for 1 hour, check whether it’s cooked by inserteing a skewer or sharp knife into the centre of the cake, if it comes out clean, it’s ready, if not, put it back in the oven for a few more minutes.

Whilst it’s cooling you can prepare your ganache mud icing…beware…reading any further may cause hardening of the arteries!

To make your mud frosting you need…

400g dark chocolate

100g unsalted butter

1tbsp golden syrup

Melt the chocolate in a saucepan and then add the butter in small lumps so that is melts into the mix. Add the golden syrup and stir until smooth. Leave the mud to cool until spreadable. This requires patience, which I don’t have, in my haste I made the mistake of trying to hurry the process along by putting it in the fridge…this accelerated the process too much and when I tried to spread the icing onto the cake it hardened into a big unspreadable blob! PANIC set in but with the help of my Mum, a spatula and a jug of boiling water I managed to avoid total disaster! You should learn from my mistakes but if you happen to have this issue too, all you need to do it warm a metal spatula or knife in boiling water and gradually smooth the icing over the cake, do a bit at a time and then reheat your implement and work on smoothing another section of icing. I’ve learnt my lesson…next time I’ll just leave the mud to cool gradually (out of the fridge) it would benefit from still being fairly gooey for optimum spreading consistency.

Cut the cake in half and spread a layer of mud in the middle before sandwiching it and coating it all over with a thick layer of amazing, so bad it’s good for you, muddy ganache!

and hey presto…it wasn’t a complete disaster and was still a goregously dense chocolate cake with a cardamom coffee twist and a coronary inducing coating…mmmmm!

I got a bit carried away with my decorating and as if the chocolate ganache frosting wasn’t enough I decided to kitsch it up with some Easter decorations and a huge gold bow so it ended up looking like some kind of alternative wedding cake :)…

As a perfectionist, I wasn’t 100% happy with the finished appearance of the cake but it turned out to be absolutely delicious. It only contained only the tiniest amount of flour, which meant that it was amazingly dense and fudgy, even my sister who doesn’t like cake, loved it!

Leave a comment

Filed under Uncategorized

Sticky rhubarb & ginger cake…Mum this one’s for you!

Last weekend my Mum presented me with a new recipe book, ‘Jamie’s Monster Bake Sale’ a collection of recipes put together by Jamie Oliver for Red Nose Day, to raise money for Comic Relief and the Jamie Oliver Foundation, not only through it’s sale but by encouraging people to try the yummy recipes and raise money by holding….you got it…a Monster Bake Sale!

All of the 13 recipes sound amazing and the 2 I’ve tried so far have been super tasty. As she handed it over, my Mum raved about the delicious looking sticky rhubarb and ginger cake at the back of the book. So my choice of Mother’s Day present was pretty much a no brainer!

Here it is…sticky rhubarb and ginger cake for my Mum…


Preheat the oven to 180 degrees and line a 20cm round cake tin with greaseproof paper.

To make the rhubarb topping…

250g rhubarb

100g caster sugar

2 tbsp stem ginger syrup

Slice the rhubarb into 4cm lengths and put them in a pan with the caster sugar and 2 tbsp of syrup from the jar of stem ginger. Bring to the boil, and then turn down and cook on a low heat for 5 minutes until the rhubarb is cooked but hasn’t turned to slush.

For the cake…

200g butter

150g dark brown sugar

2 tbsp golden syrup

150ml milk

2 eggs

300g self raising flour

2 tsp ground ginger

3-4 balls stem ginger, finely chopped and 2 more tbsp of the syrup

Heat the butter in a pan with the dark brown sugar and golden syrup, once melted set aside to cool.

Whisk the eggs with the milk and mix them together with the cooled butter mixture and finally the remaining ingredients (flour, ground and chopped ginger). Stir well before pouring into the prepared cake tin.

Carefully arrange the strips of rhubarb on top of the cake mix but save the magic rhubarb syrup for later. Bake the cake for 1 hour 20 minutes until it’s risen and beautifully golden. After an hour you can sneak a peek and if it looks like the top of the cake is browning a bit too much, loosely cover it with some tin foil for the last few minutes of cooking. When you think it’s ready, insert a skewer into the middle of the cake. If it comes out clean…it’s ready!

Here comes the best bit…spoon the sticky rhubarb syrup over the hot cake. This produces a very pleasing sizzle and a sweet, spicy, fruity aroma to die for!

Fresh out of the oven…

Try to exercise some self restraint and leave it to cool in the tin, giving the syrup time to work its way into the cake, before serving…

It turns out that the women in my family are very well tuned into each other…I discovered that we came dangerously close to having 2 sticky rhubarb and ginger cakes to gorge on…it was so delicious, it wouldn’t have been much of a hardship to be honest with you! It had a great dense but moist texture with little juicy nuggets of stem ginger throughout and the slightly tart rhubarb to cut through it, taking away any sickly sweetness!


Why not serve with crème fraiche, cream, custard, ice cream or just simply on its own…in my book, anything goes and the possibilities are endless!


1 Comment

Filed under Uncategorized

Deliciously moist blueberry soured cream cake

Is it just me or does anyone else think that cookery books make for good bedtime reading? My favourite book at the moment is 101 Cakes and Bakes. There are just so many recipes in it that I need to try out. After much deliberation this weeks cake of choice was a blueberry soured cream number, which also came highly recommended by my little brother…

mmmm looks good doesn’t it?…

I love nothing more than a house full of the buttery sweet smell of baking and the feeling of taking a freshly baked cake out of the oven…

My cake turned out to not only look divine but was also super moist due to the addition of soured cream to the cake batter. It’s one of the easiest cakes I’ve made for a long time. Here’s the recipe if you fancy giving it a go…

175g butter

175g golden caster sugar

3 eggs

225g self raising flour

1tsp baking powder

2 tsp vanilla extract

142ml soured cream

375g blueberries

Preheat the oven to 180 degrees and line an 8 or 9 inch cake tin.

Put the butter, sugar, eggs, flour, baking powder and vanilla extract in a bowl and beat until pale. Beat in 4 tbsp of the soured cream and then stir in half of the blueberries.

Pour the batter into the tin and put in the oven for about 50 minutes until firm but springy and golden brown.

Leave to cool while you prepare the frosting…

200g cream cheese

100g icing sugar

Beat the cream cheese and icing sugar together with the remaining soured cream until smooth and creamy. My icing was a bit runnier than expected because I made the mistake of trying to be more virtuous by using light cream cheese. To be honest, although it still tasted good I’d recommend going full fat for a more luscious frosting.

Spread the cream cheese frosting over the cooled cake and scatter over the remaining blueberries. The cake will keep in the fridge for a couple of days (if it lasts that long). I would go as far as saying that I think my cake was tastier after a night in the fridge…some things are worth the wait!

Leave a comment

Filed under Uncategorized

ooooo Betty!

My love of autumn has been revived by a gorgeous weekend in York…bright blue skies, fluffy white clouds, amazing autumn leaves…

and afternoon tea at a real northern institution…Bettys

Bettys is ever so popular and there’s always a queue of eager sweet toothed tourists awaiting their turn to sample the delicacies…

With this in mind I’d booked a table upstairs in the ‘Belmont Room’…

what it lacked in busy buzzy cafe atmosphere it made up for with its elegant cruise liner inspired art deco features. The waitresses were dressed in period clothes and a live pianist serenaded us…all very sophisticated!

But let me get back to the main event…

A pot of Bettys tea room blend tea…

and a tower of delicate goodies…

dainty but well filled, crustless roast ham and smoked salmon sandwiches (with real butter of course)…

a sultana scone, which had a very pleasant lemon zing to it served with strawberry jam and clotted cream…

and to top it off a minature chocolate eclair, a fresh fruit tart and a lemon financier…

The financier was so very moist and had a crunchy lemon drizzle topping (definitely on the ‘must bake’ list) but for me the raspberry tart really stole the show…extremely light pastry, a sweet, creamy custard filling to die for, topped with tart but succulent raspberries. It definitely deserves a picture of its own…

Despite having filled myself up with a huge breakfast at the hotel I managed to polish the whole.lot.off…

On the way out I had a recce of the shop, which was chock full of Bettys goodies…

It may have become a Mecca for tourists but the experience of a trip back in time to this wonderful afternoon tea emporium remains a thoroughly enjoyable experience.

Leave a comment

Filed under Uncategorized

Ruby ruby ruby ruby rubyyy…

I’m currently recovering from a very tiring but rewarding weekend. I embarked upon my biggest catering job to date, which I mentioned in passing a couple of weeks ago here. It was my friend Hannah’s parents Ruby Wedding Anniversary party and I somehow single-handedly churned out canapes and a hot fork buffet for 40 hungry revellers. I’d completely under estimated the amount of preparation time that’d be required and worked solidly all day Friday and Saturday with Han’s dad keeping me sane with a continuous supply of tunes from his ipod – bless him! 

Even though I was using an old, faithful recipe for a chocolate fudge cake that I’ve made loads of times before and had already experimented scaling it up here it was soooo much scarier tackling the real deal…12 inches, 2 layers and 10 bitten nails worth of chocolate fudge cake (rest assured no nail clippings went anywhere near the cake!)…

sandwiched and coated in litres of chocolate fudge ganache gooeyness…

and decorated with dark chocolate dipped strawberries, raspberries and my handwritten scrawl…

I was pretty happy with the finished article and luckily so were the happy couple. 

I usually make the standard 8 inch cake but to scale it up for a 12 inch cake you just need to use double quantities for each 12 inch layer (eg. 350g butter, 350g sugar, 6 eggs etc).

Here’s the recipe for the 8 incher, because after all who’s really going to be making a 12 inch monstrosity eh??…

175g unsalted butter

175g golden caster sugar

3 eggs, beaten

3tbsp golden syrup

40g ground almonds

175g self raising flour

pinch of salt

40g cocoa powder

Preheat the oven to 180 degrees and line 2 x 8inch cake tins.

Beat together the butter and sugar until light and fluffy. Gradually beat in the eggs. Stir in the syrup and ground almonds, these 2 ingredients add amazing moistness to the cake. Sift the flour, salt and cocoa powder into the bowl and fold in gently. Add a little water, if necessary, to make the cake batter a dropping consistency. Divide between the tins and bake for 30-35 minutes or until they spring back when touched and a skewer inserted in the centre comes out clean. I tend to err towards a shorter cooking time as I like it to be really fudgy although be careful as there’s a bit of a fine line between fudgy and undercooked 🙂

Leave the cakes in their tins for 5 minutes or so and then turn out to cool on a wire rack. While the cakes are cooking and cooling you can make a start on the ganache icing…  

225g plain chocolate, broken into pieces

55g dark muscovado sugar

225g unsalted butter, diced

5tbsp evaporated milk

1/2tsp vanilla essence

Put all of the ganache ingredients into a heavy based saucepan and heat gently, stirring constantly until melted. It’s really important that you don’t leave this unattended or over heat as it will become grainy. I’ve learnt that the hard way and although it still tastes good, the texture and appearance is compromised somewhat. Pour the melted mixture into a bowl and chill in the fridge for about an hour until spreadable.

Use the ganache to sandwich and cover the cake. And there, my friends, you have it…a moist, dense chocolate fudge cake with gorgeous, gooey, heart attack inducing icing…enjoy!

Leave a comment

Filed under Uncategorized

I baked a 12 inch cake, quartered it and piled it up with some very naughty chocolate fudge ganache to make the hugest, comedy slice of chocolate fudge cake in the world for my friend Nic’s birthday!

Leave a comment

24/10/2010 · 5:46 pm

Autumnal baking…

I feel like I’ve neglected my blog a bit in the last week. The annoying thing is that I’ve actually been super busy cooking and trying out recipes but have either forgotten to take photo’s or have lacked time to blog my latest kitchen exploits. My main aim for last week was to test out some of the recipes that I plan to use for a catering job that I’m taking on in a couple of weeks time…canapes and fork buffet for 40 people at a Ruby Wedding Anniversary celebration. On Monday I made courgette, chicken and pistachio couscous with an orange and harissa dressing which I managed to snap (badly) before me and Marky devoured it (I hasten to add…it was very yummy)…

Later in the week I also made pear and gorgonzola wrapped in parma ham (along these lines), sweetcorn fritters with a cucumber, tomato and avocado salsa, an all in one roasted sausage, butternut squash, new potato and beetroot bake with a dill and caper dressing and a pasta dish with pesto, garlic chestnut mushrooms and wilted spinach stirred through…sometimes the simplest of dishes are the best. Thankfully everything went really well and as true testament to the fact, my friends who I’d called upon to be guinea pigs wolfed down every last morsel with no complaints. 

I’ve just spent the weekend with an old University friend and her gorgeous 4 month old daughter. She happened to have the November Sainsbury’s magazine lying around, I’m such a sucker for a good food magazine or cook book that I took it with me for bit of bedtime reading…I was amazed at just how many amazing recipes it had packed into it! So after a lazy brunch of bagels topped with sliced avocado, smoked salmon and creamy scrambled eggs *drool* I set off back up to North London with a recipe scribbled on a scrap of paper stuffed into my handbag. I made a quick pitstop at the supermarket and when I got home I set about making…

spiced parsnip and apricot loaf with maple frosting…

I’d never heard of a cake containing parsnip before but am a great lover of carrot cakes so thought it was definitely worth a try! Here’s the recipe…

150g plain flour

50g wholemeal spelt flour

1tsp baking powder

1tbsp ground cinnamon

1 slightly rounded tsp ground cloves (I omitted this)

1tsp ground ginger

10 cardamom pods, seeds removed and crushed

4 eggs, lightly beaten

225g caster sugar

225ml groundnut oil

2 medium parsnips, peeled and grated (200g grated weight)

100g pecan halves, chopped

100g ready to eat dried apricots, chopped

For the maple frosting – 

75g soft unsalted butter

200g light cream cheese, chilled

100g greek yoghurt, chilled

1 1/2tbsp maple syrup

1tsp ground cinnamon

50g icing sugar

Preheat the oven to 180 degrees and line a 9 x 20cm loaf tin.

Sift the flours (I used self raising wholemeal flour so I only added 3/4 tsp baking powder) and baking powder into the bowl of an electric mixer (or use a handheld mixer). Tip any bran left in the sieve into the bowl too. Add the spices, eggs, sugar and oil and beat together. Fold in the grated parsnips, pecans and apricots and pour into the tin.

Bake for 1 hour 15 – 1 hour 30 minutes until golden and risen. Leave it to cool in the tin.

For the frosting whisk together the butter and cream cheese. Add the rest of the ingredients and mix together. Put in the fridge to chill until later when the cake is fully cooled. Turn it out of the tin and  slather the frosting over the top.

For some reason my frosting turned out to be far too runny. It tasted good but was more pouring than spreading consistency. The cake was lovely and moist, rather like a carrot cake but with a gorgeous sweetness provided by the parsnip and nuttiness from the pecans. The edges had kind of caramelised (and no that’s not just code for burnt) which added a really lovely texture and flavour. I still, for the life of me, can’t work out what went wrong with my frosting but the fact that it was runny wasn’t detrimental to the overall taste of the cake and I guess that’s what really matters. 

Leave a comment

Filed under Uncategorized