
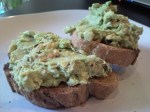
Breakfast of champions…crushed avocado with chilli flakes on rye toast!
11/06/2011 · 12:02 pm
The boy done good…
Last night I experienced a rare treat…being cooked for in my own kitchen! All I had to do was sit back and relax with a large glass of red wine and watch the magic happen…

I was presented with garlicky mushrooms with creme fraiche and lemon thyme…

and deliciously naughty tartiflette…layer upon layer of potatoes, onions, garlic, bacon lardons, creme fraiche and reblochon cheese mmmm….

This experiment has proven that…
a) reblochon is officially my favourite cheese of the moment…
b) I definitely need a private chef to keep up the standards to which I’ve become accustomed!
and…
c) I need to start my half marathon training sharpish to counterract the sheer amount of calories I foresee being ingested if b) ever happens (in my dreams) 🙂
Filed under Uncategorized
Da Polpo…the newest kid on the block.
If you’re a twitter obsessed foodie or even a foodie obsessed twitterer and you live anywhere near London you can’t have missed the Russell Norman shaped whirlwind that has hit soho in the last couple of years. His restaurant dynasty has grown from Polpo, opened in 2009, to include Polpetto (2010) and Spuntino, which opened earlier this year to rave reviews! And only last week the newest kid, Da Polpo, arrived on the block! As addicted to twitter as I am, I was unbelievably excited to be in the right place (on twitter) at the right time, when @polposoho announced that Da Polpo was opening earlier than expected and 50% off bookings were being taken for bank holiday Monday! I dropped everything and dialled the reservation line continously until I got through…I’m a stubourn bugger and once I’d got the idea in my head I was not going to give up without a fight!
I eventually got through and secured a table for 2 for 3pm on Bank Holiday Monday, late enough to have recovered fully from any kind of hangover a bank holiday Sunday may have produced 🙂 I wasn’t even entirely sure who I was going to take at this stage but hey, worst case scenario, I’m sure I could always eat enough for two!
Da Polpo’s exterior was pretty unassuming and I nearly walked straight past but once through the doors the recognisable Polpo quirkiness and ever-friendly service was very apparent. We were actually greeted by Russell himself and given the guided tour of both floors before deciding to settle upstairs.

I think between us, me and my chosen foodie, Owen, are probably the most indecisive people ever…the main problem being that we love food…all of it! We asked our waiter for some assistance and then went with everything he recommended…not too much pressure on the poor man on his first day 😉
First up we had arancini…

which are basically risotto balls coated in crispy breadcrumbs. These ones had the most amazing gooey centre…

Next up, one of their trademark dishes…pizzette. We opted for the white anchovy, olive and basil…
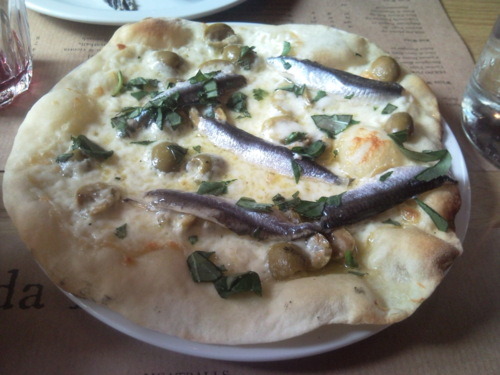
I loved it but Owen thought the strength of the anchovy overpowered the other ingredients a bit too much…saying that, he still managed to wolf it down 😉
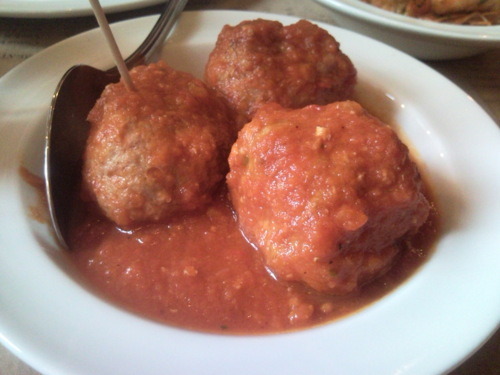
The Da Polpo menu is a bit more relaxed in style than it’s older brothers Polpo and Polpetto and includes a special meatball section. Again we asked for our waiters preference and hung on his every word, ordering these spicy pork and fennel beauties…
accompanied by a heritage tomato salad. The following photograph may look like a mere bowl of tomatoes…but man! even their tomatoes were a taste sensation!…

However the piece de resistance for me was the chilli and garlic prawns…

We savoured every last morsel, asking for extra bread to mop up the delicious garlic, chilli oiliness left behind so as not to waste a single drop! I have a feeling we could have killed a vampire at 50 feet afterwards but they were most definitely worth the risk…nothing a packet of chewing gum couldn’t fix!
Finally we chose an affogato al caffe each…a shot of espresso poured over a single scoop of creamy vanilla ice cream…

The perfect end to an amazing meal! The 50% off was of course an added bonus, however we both loved the meal and agreed that we would have happily paid full price for such delicious food and friendly and accomodating service. I for one will be returning very very soon!

Filed under Uncategorized
Wedding season is upon us…
The last 2 weekends have been devoted to matrimonial celebrations…a whirlwind of gorgeous dresses, buffets, booze, confetti and cakes, topped off with a healthy dose of air guitaring and shape throwing on the dancefloor 🙂
I realise that the standard protocol for wedding presents is to buy the happy couple something from their wedding list but…I don’t like to conform and instead decided that a home baked cake was a far better present! Once again I put my cake-transporting-on-London-buses skills to the test and somehow managed to get this little beauty all the way to Whetstone unscathed…

I was very proud of of the finished cake, although the perfectionist in me was a bit disappointed in the slight non-uniformity of the heart and…I was told by a guest that I wouldn’t cut it as a plasterer! the cheek! But it’s the thought that counts right? and whether it actually tastes any good (which it did!).
What you can’t see from the photo above is that beneath the layer of gorgeous cream cheese frosting is a triple layer red velvet cake….

I followed the Hummingbird Bakery recipe, which I’ve used previously to make these cupcakes.
To make an 8 inch cake you need…
120g unsalted butter
300g caster sugar
2 eggs
20g cocoa powder
40ml red food colouring (the recipe recommends Dr Oetker red food colouring but I used concentrated gel, which means you can use a lot less)
1tsp vanilla extract
240ml buttermilk
300g plain flour
1tsp salt
1tsp bicarbonate of soda
3tsp white wine vinegar (weird I know but stay with me here)
Preheat the oven to 170 degrees and line an 8 inch cake tin. I made do with 1 tin and sliced my cake into 3 but if you’re lucky enough to have 2 or 3 tins you can make the layers separately.
Put the butter and the sugar in a freestanding electric mixer or use a handheld version to beat them until light and fluffy. Add the eggs and mix on a lower speed until they are well incorporated.
In a separate bowl mix the cocoa powder, red food colouring and vanilla extract together to make a thick, gloopy, dark red paste. If you’re using the concentrated gel food colouring you only need about 1tsp but you may need to add a splash of water to make it into a paste.
Add your red gloop to the butter mixture and blitz it up until evenly coloured.
Pour in half of the buttermilk and mix at a slow speed, add half the flour and mix, then add the rest of the buttermilk and finally the remaining flour. Then give it one last mix just to make sure.
Finally, add the salt, bicarbonate of soda and vinegar (which creates an enjoyable fizz!) and mix it slowly into the cake batter for a couple of minutes.
Pour the finished mixture into your prepared tin(s) and put in the oven.
If you’re using 3 tins, bake for about 25 mins.
If you’re using 2 tins, pour a third of the mixture in one (this will need to cook for 25 mins) and two thirds of the mixture in the other (this will probably need a few minutes more approx 30/35).
If, like me, you’re lacking in the the tin department and are just using the one, you’ll need to cook it for about 50 minutes. I checked mine after 45 minutes but it was still very runny in the middle. You’ll know it’s ready when a knife or skewer inserted into the middle of the cake comes out clean.
Leave the cake to cool fully before icing it. To make the icing you will need…
600g icing sugar
100g unsalted butter (at room temperature)
250g cream cheese (cold)
Beat the icing sugar and butter together (this gets a tad messy) using either a freestanding or handheld electric mixer. The recipe says to beat it until the mixture comes together but I always lose patience and in an attempt to limit the amount of icing sugar wafting around my kitchen, I add the cream cheese pretty much straight away. I usually zap the butter in the microwave for 30 seconds first aswell, to make sure that it blends in well and that there aren’t any little lumps of butter left in the icing. Once all of your icing ingredients are incorporated, turn up the speed and beat well for about 5 minutes until smooth and creamy. Be careful not to overbeat it or it’ll become runny.
Use the icing to sandwich each of the 3 layers and to coat the top and sides of the cake. I use a metal spatula, which I dip in boiling water regularly…it makes smoothing the icing out a lot easier.

I think I may have gotten a bit carried away with the glittery sprinkles but I reckon the decoration fitted perfectly well with the brash, garish-ness of the bright red velvet sponge cake inside…


Who would’ve thought that a cake containing buttermilk and vinegar would work…but it does! and produces a gorgeously moist cake everytime!

Filed under Uncategorized


If you haven’t visited St. Ali, the new coffee shop that’s opened on the junction of Clerkenwell Road and St John Street….you should! I popped in on the way to work earlier this week and have developed a little bit of a crush on it! Gorgeous, old, battered communal tables, a green wall, a magic coffee roasting machine standing up on a pedestal for all to see, very friendly attentive service and above all…bloody good coffee!
26/05/2011 · 9:00 am
What happens if you cross 11 avid foodies with a private chef?…
I love being in the right place at the right time…which is exactly where I was early on a Saturday morning, sitting at my laptop when an email popped into my inbox from Luiz, the London Foodie. He was offering up a couple of spaces at his London Cooking Club the following weekend due to cancellations. I jumped on it without a second thought as spaces are highly sought after and I’d had a great evening last time I attended the evening of French Provincial Cooking using recipes by Elizabeth David. The theme of this month’s club was ‘The Best of British’ and I was very excited to learn that we were to have our very own chef on hand for the evening to help us put the finishing touches to our dishes. Our Private Chef, David Gillott, runs his own company, catering for dinner parties, functions, weddings and even offering cookery classes in your own home! Our epic menu was made up entirely of David’s own recipes with a British Theme…

The idea of London Cooking Club is for each guest to choose and prepare a dish from the set menu for everyone to taste, along with a wine to accompany it.
First up Gina Wessels, who writes a blog called Midweek Feast made mini Yorkshire puddings with roast beef…

Amazingly, it was her first ever attempt at Yorkshire puds, they were delicious and piled high with tender beef and some really good, hot horseradish sauce, which Im reliably informed I can pick up from Waitrose!
Hugh and Liz, our lovely hosts served rillette of salmon in perfect quenelles on melba toast…

We all seated ourselves around a huge table in Hugh and Liz’s open plan kitchen and tucked into traditional potted shrimps, made by May of Slow Food Kitchen fame…

Asparagus with hollandaise sauce also from Hugh and Liz…

Rosemary brought along what seemed like a never ending platter of fresh dressed crabs…

Believe it or not we were still only on the starters at this stage, the last of which was chilled watercress soup. I hit the jackpot and was served my soup in the highly coveted Gruffallo cup :)…

Next up Hana served a jerusalem artichoke pithivier…

I’d never heard of a pithivier before and was enamoured by the delicious mixture of artichoke, mushroom and puy lentils all encased in crispy puff pastry…

Libbie made one of my all time favourite dishes…kedgeree! Libbie’s a great cook but admitted she’s never even tasted a kedgeree before let alone made her own…luckily David was on hand to advise and the finished dish was amazing!…

The prize for most spectacular dish goes to Luiz and Gerald’s beef wellington…


The pastry was crisp, the meat was oh so tender and it was served with a potent wild mushroom sauce, which accompanied it perfectly…

Su-Lin’s English garden salad was the final part of the epic main course… potatoes, runner beans, lancashire cheese, sunblush tomatoes and mint in a honey and mustard dressing…

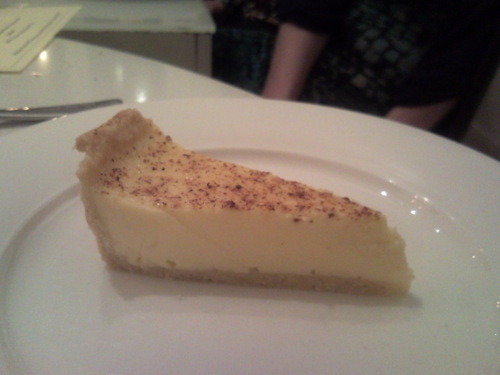
Finally it was my turn! I’d asked to make the baked egg and vanilla custard as it’s something I’ve never made before and as you may have realised by now…I’ve got a bit of a sweet tooth!
I made my tart on Friday night just in case it went wrong so there was still time for a second attempt. The finished product looked a bit more ‘rustic’ than I’d hoped…

But luckily David’s recipe (see below) produced an amazing tart, the buttery rich, lemon infused pastry, balancing the creamy custard filling and freshly grated nutmeg perfectly…
Earlier in the week I’d written to my good friend, Hannah, who’s Publisher of Imbibe Magazine and asked for her advice on what wine I should serve with my tart. She replied with a recommendation from none other than Kelvin McCabe, Head Sommelier at Zuma, who said that I should be going for a sweet wine with good acidity, light to medium bodied with clean citrus notes such as an Auslese Riesling, a young fresh Sauternes or a Coteaux du Layon. I visited a local wine shop and chose a half bottle of Le Grand Chai Sauternes 2006…deliciously fruity with mellow honey notes without being too overly sweet…

Last but not least, David took the floor and made us a layered dessert of rhubarb jelly, white chocolate mousse, rhubarb compote and a surprise layer of popping candy…

all topped off with some very ‘cheffy’ foam! It was a beautiful concoction and tasted pretty darn good too…

How we managed to fit it in after 10 courses I will never know but we all scraped our glasses clean! After a restorative peppermint tea, we dragged ourselves home to have a well deserved lie down! All in all a wonderful evening full of divine food and passionate foodies!
And here’s how you make David’s baked egg and vanilla custard …
For the pastry case you need…
225g flour, plus extra for dusting
pinch of salt
zest of 1 lemon
150g butter
75g caster sugar
1 egg yolk
1 egg
Rub together the flour, salt and butter until the mixture resembles breadcrumbs. Adding the lemon zest at the rubbing in stage made sure it was really infused into the mixture…a great touch! Stir in the sugar. Beat the egg yolk with the whole egg and slowly add these to the dry mixture until the pastry forms a ball. This stage got a bit sticky but don’t panic just wrap the dough tightly in cling film and put it in the fridge for a couple of hours.
Preheat the oven to 170 degrees.
Roll the pastry out on a lightly floured surface until it’s about 2mm thick. Lay it over an 18cm/7inch flan dish, carefully pressing it into the corners and trimming the edge. Line it with greaseproof paper and fill with baking beans. Put it in the oven to blind bake it for about 10 minutes or until the pastry is starting to turn golden brown. Remove the paper and beans, and allow to cool.
For the custard filling you need…
9 egg yolks
75g caster sugar
500ml whipping cream
freshly grated nutmeg
Turn the oven down to 130 degrees.
Whisk the yolks and sugar together. Add the cream and mix well. Pass the mixture through a fine sieve (I used a square of muslin in a normal sieve as I was worried mine wasn’t fine enough) into a saucepan and heat it to blood temperature. I’m not sure how important the temperature is but I realised I wasn’t sure what blood temperature actually was…I recommend going with your gut ;). Once you’re happy with it fill the pastry case with the custard until it’s 5mm from the top. Carefully place the dish in the middle of the oven and bake for 30-40 minutes or until the custard appears set but not too firm. Once cooked, remove it from the oven and cover the surface liberally with grated nutmeg.
Leave it to cool to room temperature before cutting the tart with a sharp knife. David recommended wiping the knife between cuts to keep it uber neat. Then all that’s left to do is sit back and enjoy…preferably wih a chilled glass of Sauternes! 🙂
Filed under Uncategorized
A bit of crumpet
Are you sitting comfortably? yes? good, because I’m about to take you on an epic journey of crumpet experimentation…
Behold, my gorgeous, freshly homemade crumpet dripping with melted butter…

And now behold the saga that preceded that innocent looking bit of crumpet 😉 …
Way back in January I read Food Stories blog post ‘Cracking Crumpets’ and loving nothing better than a challenge, felt compelled to give crumpets a go! The reality is that it’s taken me nearly 4 months to get my act together. But this weekend I embraced my un-hungover state, got straight out of bed and into the kitchen…baking in pyjamas is what Sundays are all about!
So following Food Stories recipe, to make approx 14 crumpets you need…
360g plain flour
2 tsp dry yeast
580ml warm milk
1 1/2 tsp salt
1 tsp sugar
1 tsp bicarbonate of soda
Mix the the yeast and the sugar in a bowl with 250ml of the warm milk. The milk needs to be warm to activate the yeast but not hot! Cover the bowl and leave it in a warm place for about 10 minutes to go frothy.
Sift the flour, salt and bicarbonate of soda into a big bowl. Make a well in the centre and add the yeasty mixture and finally the rest of the warm milk. Stir using a wooden spoon until smooth. Cover it with cling film and leave it to rest in a warm place for about an hour. Food Stories said that the clingfilm would rise up as the gases build up inside the bowl but fo some reason mine didn’t. I have a feeling that this might have been the reason that my finished crumpets were lacking in holes!
To cook the crumpets you need to heat a heavy bottomed frying pan over a medium heat then turn it down low. Using a piece of kitchen paper, wipe some oil over the base of the pan so it’s got a thin coating all over. Also oil your crumpet rings very well! Then our the batter into the rings.
Behold attempt #1…

I was very excited to see bubbles forming on the surface and had high hopes, which were dashed when this is what I ended up with…

I moved swiftly on to attempt #2, this time making sure I didn’t stinge on oil when greasing my crumpet ring…

Food Stories instructions said to leave the crumpets to cook for about 8 minutes until the top looks like it’s drying out, mine were taking longer than 8 minutes to get to that stage but following twitter advice from @Cookinfrance to ‘hold fast & wait for those bubbles!’ I held my nerve and waited. Once they reached what I felt was dried out looking enough, I turned them over for a short while just to brown the top…

Attempt #2 was definitely looking more crumpety but I decided I’d try not filling the ring all the way to the top…halfway is more than enough to make a good crumpet.
By attempt #3 I was getting cocky (read impatient) and started cooking 2 at a time…

Less is most definitely more…I was chuffed to see that I’d finally made my very own crumpets, that actually looked and tasted like crumpets…

The only thing my crumpets were lacking were holes! I’d followed the advice given to Food Stories by Ms Marmitelover to add more bicarbonate on soda than the recipe says and still my bubbles didn’t seem to want to surface. As time passed a few more holes graced me with their presence…

and with each attempt my crumpet confidence grew until I was producing these beauties…

I can vouch for the fact that the lack of holes didn’t affect their deliciousness. My crumpets were the perfect weekend tea time treat, one that I’ll definitely be making again…practice makes perfect right!?

Filed under Uncategorized


I made this quadruple layer blueberry cheesecake gateau birthday cake for my friend Hannah and took it to her party in a bar near Tower Bridge. On looking out the window at the amazing view over the river and City Hall…I realised that I’d subconsciously recreated the iconic building in my slightly ramshackle cake construction 🙂 Well that’s my excuse and I’m sticking to it!
08/05/2011 · 11:35 am
Sticky lime & coconut drizzle loaf…
I’m not a great fan of dessicated coconut, it conjures up images in my mind of bright pink, sickly sweet coconut ice. I recently discovered a recipe for sticky lime and coconut drizzle loaf and was pleased to see that there wasn’t a speck of it in sight, just an intriguing combination of coconut milk and fresh lime…definitely worth a try!
I think it’s one of the easiest things I’ve baked in a while and although it looked fairly unspectacular…the deliciousness lurking under that loaf like exterior was incredible…

To make sticky lime and coconut drizzle loaf you need…
100g butter, softened
175g self raising flour
1 tsp baking powder
175g golden caster sugar
2 eggs
half of a 400ml tin coconut milk
grated zest of 2 limes
Preheat the oven to 180 degrees and grease and line a 2lb loaf tin (or use a silicone version).
Simply beat all of the cake ingredients together until smooth and the pour into the tin.
Bake for 40 minutes until golden brown and firm to the touch…easy peasy!
To make the drizzle icing you need…
the other half of the 400ml tin of coconut milk
200g caster sugar
grated zest of 1 lime
Juice of 3 limes
Boil the coconut milk and 150g of the sugar in a saucepan for about 5 minutes until it’s syrupy. The recipe I was following said that you should be able to see the bottom of the pan when you stir it, however I boiled mine for about 10 minutes and it just didn’t seem to want to get to that stage. So I made the executive decision to turn it off, which thankfully didn’t seem to have any kind of detrimental effect on the finished product! I’d recommend that you use your judgement on boiling time/syrup consistency, but once you’re happy with your syrup, stir in the lime juice and set it aside to cool.
Mix the remaining sugar with the lime zest and set aside for later.
Leave the cake in it’s tin, whilst you gradually drizzle the syrup over the top. Wait for it to sink into the loaf before repeating the process. I was amazed at just how much liquid my little cake could absorb!
Leave the cake to cool fully before carefully removing it from the tin. Finally sprinkle the lime sugar over the top…

The syrupy drizzle makes it unbelievably moist and the fresh lime juice and zest adds a great zingyness to the mix, which balances and compliments the creaminess of the coconut milk.
I decided it was the most perfectly topical birthday cake for my friend, who recently found out he’s going to be a Dad. Their baby is still only a wee thing…apparently the size of a lime! 🙂

The cake was an absolute winner and disappeared in in a matter of seconds!
I received a lot of complaints…that there just wasn’t enough of it (note to self…1 loaf is just not enough!)
Filed under Uncategorized
The Hip Hop Off at Mason & Taylor…
Thanks to Qype, I was lucky enough to get a sneaky preview of Mason & Taylor’s first ever ‘single hop real ale & craft beer festival…The Hip Hop Off! I’d heard a lot about M&T, which opened in December and was especially intrigued by their beer tasting flights, which are served in gorgeous 1/3 pint glasses in trays of either 3 or 6.
It was a day of new beginnings for me as I took my first ever trip on the (not so) new East London Line to Shoreditch High Street…merely a hop (apologies for the pun), skip and a jump from Mason & Taylor!
The sun was shining and upstairs was buzzing with an after work, long weekend, celebratory atmosphere, so I was a bit disappointed to be led into a fairly dark, empty basement…little did I know that this is where the Hip Hop Off magic was all set to happen…10 ales were rigged up on a specially constructed water-cooled gravity racking system in preparation for the festival the next day.
Now, I’m not what you would call a serious beer drinker, I don’t know if I should shout about it but I’m more of a lager fan myself. However, just listening to M&T’s beer aficionado, Steve Taylor, wax lyrical about it made me feel that I was well on my way to becoming a convert…what that guy doesn’t know about beer just isn’t worth knowing! His enthusiasm is completely infectious and I felt like we were in very capable hands, as he talked us through the 6 beers we were sampling…

Amongst others we tried Kernel’s IPA Citra, Thornbridge’s Kipling and Brodie’s Pink Pride, which contained fresh raspberries, adding a very fruity dimension without any stereotypical ‘fruit beer’ sickliness!
we also got to sample some of the food that they’d be serving during the festival, which had all been prepared using hops in some way or another…
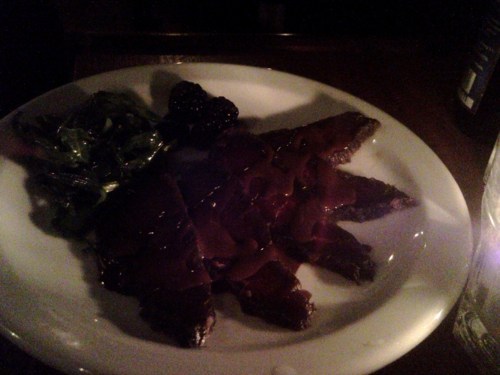
My photography is shocking but I can verify that the duck breast, which had been smoked using citra hops was absolutely delicious!…

as was the venison that had been cured in hops and served with a chocolate and barley sauce…(meat and chocolate…how can you go wrong?)
Although the Hip Hip Off was a special event for the Easter weekend, M&T’s beer selection on a normal day is pretty darn impressive… ‘12 draught beers and ales on tap at any one time and a seasonal list of 40 bottled beers which changes every 2 months’. They source all of their beers through independent breweries including a couple of my faves…Kernel and Camden Town. They also serve up a tempting menu of small plates of food…ideal for sharing and soaking up some of the stronger beers! :).
I feel it’s my duty as a newly converted beer drinker to sample more of Mason & Taylor’s wares very soon…let’s call it homework!
Filed under Uncategorized
