Tag Archives: recipe

Boozy lemon & honey pots with blueberries…

My friend invited me over to lunch last weekend and as is very commonly becoming the norm, I was tasked with making the dessert. I decided to mix it up a bit and shunned the idea of baking anything, instead experimenting with a delicious sounding recipe for lemon and honey pots with blueberries that I’d seen in the February 2012 edition of Sainsbury’s magazine…

They sounded great and apart from the slightly fiddly task of making candied peel, were pretty simple. They also gave me the perfect excuse to make use of the last of my home made limoncello (recipe here)…

To give them a go all you’ll need is…

Finely grated zest and juice of 1 lemon

2 tbsp clear honey

2 tbsp limoncello (optional but highly recommended)

300ml double cream

1 large egg white

4 tbsp blueberries plus extra to decorate (apparently frozen ones are fine)

and to make the candied peel you’ll need…

Peel of 1 lemon, sliced into thin matchstick-like strips

100g caster sugar

I recommend starting on the candied peel first to get the fiddly bit out of the way. Use a vegetable peeler to take the rind off the lemon, be careful to only take the yellow layer and not any of the white pith as it’s really bitter. Slice each strip into long matchsticks. Put them in a pan of boiling water and blanch them for 30 seconds before draining and setting aside. Then put 100ml of water in a saucepan along with the caster sugar and bring to the boil. Leave it to bubble away until it starts getting syrupy. Add the peel to the syrup and leave to boil away for 10 minutes. Now comes the tricky bit…remove the strands of peel from the pan and lay them on some greaseproof paper to cool. I used some kitchen tongs that were large and unwieldy, making the task quite messy and arduous. The recipe suggested using tweezers but that just sounded ridiculous. I’m not sure what the perfect solution is but feel free to freestyle your own method 🙂

Now you need to start making the main part of the dessert…

In a small bowl, mix the lemon zest, juice, honey and limoncello together.

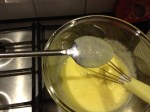
In another bowl, whisk the cream until it forms soft peaks. Do the same with the egg whites in a separate bowl. Then tip one into the other and fold together gently so that you retain the light airiness of the egg whites.

Finally fold in the lemon and honey mixture and make sure it’s well combined.

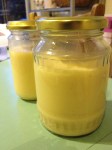
Put a spoonful of blueberries in the base of 4 glasses. Spoon in the creamy, lemony mixture and put in the fridge to chill until you’re ready to serve them.

Just before serving top each pot with a few strands of candied peel and a few more blueberries. I also toyed with the idea of drizzling a tiny bit of neat limoncello on top but decided against it at the last minute…maybe next time.

They were the perfect end to what had been quite a substantial dinner…light, zingy and creamy all in one!

Leave a comment

Filed under Uncategorized

My annual Seville orange marmalade expedition in pictures…

Last year, I adopted a new annual tradition of Seville orange marmalade making. I’d never attempted it before last January and haven’t tried it again since, that is until last weekend. This is mainly because the Seville orange season is only a short one (Dec-Feb), which is now nearing it’s end. To be honest, I think it’s something about the transience of these gnarly, nobbly citrus fruit that appeals to me, along with the fact that they produce awesome, bitter sweet marmalade that really packs a punch! I like a full bodied, brash marmalade, Robinson’s Golden Shredless will never grace the shelves of my fridge!

I decided to use the same Nigel Slater recipe as last year (recipe here) but to double it to make a batch of 10 jars. Before even setting to work I had assigned homes to a number of jars and I wanted to make sure there was enough left to satisfy my own addiction!

In the space of a year I seemed to have forgotten the amount of work that goes into chopping the peel of 24 oranges and 4 lemons…

2 Hours later, there I was still (not so) patiently shredding the peel…

I got there in the end though, all be it with one arm that would have made Popeye proud!

The peel and juice went in a couple of pans to soak over night, along with muslin bundles packed with the pith, pips and general leftover orange goodies…

The next day I set to work boiling up the pots of peel until they were tender…

Before adding the sugar…

and bringing them to a rolling boil…

This part of the process is the most nervewracking and time consuming. I spent the best part of two hours watching my boiling pots, skimming scum from the surface and testing it every 10 minutes to see whether it had reached the optimum setting consistency, whilst marmalade laden condensation dripped down my kitchen windows!

The magical moment eventually arrived and I was delighted to have produced a vat of beautifully deep, dark, tangy Seville marmalade goodness…

Which I spooned into a motley crew of jars…

In the last couple of weeks I’ve been drawn into quite a few marmalade based discussions and have realised that preferences in consistency, density of peel and coarseness vary greatly from person to person. The beauty of making your own marmalade, apart from the pride you feel afterwards, is that you can make it exactly how YOU like it! Mine is getting better year on year…can’t wait ‘til next January’s attempt.

Leave a comment

Filed under Uncategorized

Rustic oatcakes…just add cheese, chutney, wine & friends

The other day I was perusing the shelves of Arjuna, Cambridge’s oldest vegetarian wholefood shop, when I came across a bag of fine oatmeal. Now, maybe I just need to get out more or maybe I just haven’t been looking very well, but fine oatmeal doesn’t seem to be widely available in the supermarket. I wasn’t even sure what I could make with aforementioned oatmeal but I was stupidly excited and bought it anyway.

It wasn’t long before the perfect recipe presented itself to me as did the perfect occasion. On Friday night I rushed home from work and set about making buttermilk oatcakes to take to a friends as an after dinner treat along with some Brie, St Agur and a pot of last years plum chutney given to me by another foodie friend…

The oatcakes were super easy to make and I loved their rustic look…better than the shop-bought, cardboard-like variety any day!

To make them you need…

200g fine oatmeal (if you’re lucky enough to find some or alternatively rolled oats, blitzed into a fine powder in a blender)

1/2 tsp bicarbonate of soda

2-3 tbsp sugar

1/2 tsp salt

50g unsalted butter

175ml buttermilk

Preheat the oven to 150 degrees and line a couple of baking trays with greaseproof paper.

Put the oats, bicarbonate of soda, sugar and salt into a large bowl. Cut the butter into small pieces and rub it into the dry ingredients with your fingertips until it has the texture of coarse sand and there are no big lumps left. It’s a lot easier if the butter is at room temperature. Stir in the buttermilk to form a gloopy paste.

Take a heaped teaspoon of the mixture at a time and roll into a ball, then place onto the prepared baking tray. Make sure the balls are about an inch apart before sprinkling them liberally with some more of the oatmeal. Now flatten each ball out into a disc about half a centimetre thick and don’t worry if they don’t look perfect…

Bake in the oven for about 25 minutes until they are firm in the middle and starting to go golden in colour around the edges. Leave them to cool on a wire rack. Now all that’s left to do is savour them with your fave cheese and a nice glass of red :)…

Leave a comment

Filed under Uncategorized

Ditch the detox and get baking…apple, walnut & custard cake…

One of my favourite Christmas presents was my ‘Short & Sweet’ recipe book by Dan Lepard (or Def Leppard as my Mum has coined him)…

His recipes in the Guardian magazine have had my mouth watering on many occasions and I’ve already attempted his clementine and oat muffins

his herb roti, which I served up with a curry made from Christmas leftovers…

and his sticky lemon and poppy seed cake

However, my first choice from the many ‘must bake’ items, which I’ve earmarked, was this amazing apple, walnut and custard cake…

There are three main stages to this cake, so not the quickest of bakes but well worth the effort!

Preheat your oven to 180 degrees and line a 20cm cake tin with greaseproof paper.

First up you need to make the custard. You’ll need…

175ml milk

2 tsp vanilla extract

50g light soft brown sugar

2 tbsp cornflour

1 medium egg

Whisk all of the ingredients above, together in a saucepan until smooth. Bring to the boil, whisking continously until it’s thick. I found that the turning point came about very suddenly so don’t get complacent, just keep whisking! Once it’s reached a very thick consistency, spoon it into a lightly buttered bowl and chill until firm. 

Next up you need to prepare your apple and walnut filling. You need…

50g light soft brown sugar

3-4 dessert apples, peeled, cored and quartered

75ml brandy

75ml water

75g walnuts, chopped

Place all of the ingredients above in a frying pan and cook over a high heat until the liquid has evaporated. Then leave to cool whilst you make the cake batter. For that you’ll need…

100g light soft brown sugar

75g unsalted butter, softened 

2 eggs

50g plain flour

1 1/2 tsp baking powder

Beat the sugar and butter together with an electric or handheld mixer (or a lot of elbow grease) until light and smooth. Beat the eggs in one at a time until thoroughly incorporated. Finally stir in the flour and baking powder with a spoon. Chop the set custard into chunks and fold into the cake batter being careful not to break it up. Now, tip it into the prepared cake tin… 

and finally, place spoonfuls of the apple and walnut mixture on top. Swirl it slightly with a teaspoon to make sure it’s bedded in well. Then pop it into the oven for about 50 minutes…

At which point it will look like this…

Serve it warm, drizzled with maple syrup and a good dollop of creme fraiche…

The apples retain a slight crunch, the walnuts are beautifully caramelised and brandyfied and if that weren’t enough, you’re rewarded with fantastic pockets of vanilla laden custard…sheer heaven on a plate! ditch the detox and get baking!

Leave a comment

Filed under Uncategorized

Last week I saw ‘Eat Like a Girl’s’ recipe for blood orange and rhubarb curd in the Evening Standard and stored its existence in my memory banks until the weekend, when I happened upon blood oranges for sale on the market. I rushed home and started preparing only to discover that I’d been duped and sold a dud blood orange (read ordinary orange). I decided to just plough on anyway and although my finished curd was fairly insipid in colour, I am happy to report that it tasted divine…less tart than lemon curd (obviously) but with a great rhubarb tang. I passed up the meringue pie in favour of slathering it on thick slices of toast! perfect!

Leave a comment

10/01/2012 · 10:00 am

Homemade Christmas moonshine…

I know Christmas has passed but I couldn’t withhold the most successful of my homemade Christmas gifts…both alcohol based!

First up I made a litre of liquid Christmas pudding by infusing vodka with all the typical ingredients that you’d associate with the traditional dessert. I discovered the recipe on the Domestic Sluttery website here. It was unbelievable easy and the only effort required on my part was in chopping up the fruit to bung in a large bowl along with the vodka…

and then to stir it up and give it a bit of love every day…

sampling every now and again of course 😉 …

After a week, I used a piece of muslin and a funnel to decant it into a pretty bottle and hey presto…

My other seasonal concoction was a rather large batch of Limoncello, an Italian lemon liqueur, which originated from Southern Italy. It took slightly longer to prepare but was equally as easy. The recipe I used was from the BBC Good Food website here.

Basically all you need to make 2 litres is…

5 unwaxed lemons

1 litre of vodka

750g caster sugar

700ml boiling water

and some large receptacles for brewing your limoncello up in!

Simply zest your lemons, being careful not to get too carried away as you don’t want to include the bitter white pithy layer, just the bright yellow outer zest!

Put the zest in a large jar and pour over the vodka, seal and leave for a week, giving a gentle shake of encouragement daily…

After a week, put the sugar in a bowl and pour over the boiling water. Stir until it has fully dissolved. Without thinking I used golden caster sugar, which gave my limoncello a deeper colour than if I’d used the white variety…no harm done!

Add the sugar syrup to the vodka and lemon peel and leave to infuse for another week…don’t give up on the daily stir of encouragement…

Appearance-wise nothing much happened but the taste developed beautifully as time went on…

After a couple of weeks I strained my limoncello into pretty bottles and there you have it…

Limoncello is best served straight from the freezer as a digestif and it’s ridiculously delicious!

At this point I’d like to wish anyone who reads my inane food related ramblings a very Happy New Year! I for one can’t wait to see what 2012 brings…hopefully many more baking exploits and delicious meals! 🙂

1 Comment

Filed under Uncategorized

There’s still time to make some Christmas granola…

Recently, whilst flicking through one of my Mum’s food magazines a recipe for Christmas granola jumped out at me. I whipped up a batch last weekend and was really pleased with the jewel-like, crunchy, delicious outcome…

It’ll take pride of place in the homemade hampers that I’m gifting my family members with this year along with the caramelised red onion chutney and balsamic pickled shallots, which I’ve blogged recently.

All you need to make about 2 litres of the stuff…

500g rolled oats

1 x 90g pack sunflower seeds

1 tsp ground cinnamon

3 tsp ground allspice

150g maple syrup

100g light brown sugar

300g mixed nuts, roughly chopped

750g mixed dried fruit, roughly chopped (I used dates, apricots, sultanas and these amazing crimson raisins, which I found in Sainsburys)

100g dessicated coconut

Preheat the oven to 180 degrees. 

Put all of the ingredients except for the dried fruit and coconut into a large bowl and get your hands dirty mixing it all together and making sure that everything is coated in syrupy, sugary, spicy goodness.

Pour the mixture out onto 2 to 3 baking sheets and bake for 10 minutes. The added bonus is that it’ll make your kitchen smell absolutely divine. When the time’s up, take the trays out and shake them up, turning the mixture over before popping back in the oven for another 10 minutes.

Whilst the oaty mixture is in the oven you can mix the dried fruits and coconut together in a bowl ready for later.

Remove your granola from the oven and leave it to cool…

Then simply mix everything together and decant it into pretty jars…

Use your artistic license to cover the lids and/or add labels…

Easy as pie…or granola!

Leave a comment

Filed under Uncategorized

That’s shallot! more last minute Christmas presents…

Christmas is all about sharing…so here’s another recipe for you. Balsamic pickled shallots, easy peasy to make and ready to eat in 3 days…the perfect last minute Christmas present…

All you need to make about 4 jars is…

750g small shallots

500ml white wine vinegar

75ml olive oil

300ml water

70g golden caster sugar

1/2 tbsp salt

1/2 tsp black peppercorns, cracked

1 handful basil leaves

50ml balsamic vinegar

Put your shallots into a large bowl and pour over a kettleful of boiling water. Leave them to sit for a few minutes, drain and as soon as they’ve cooled enough to handle, get peeling!…

Put all of the other ingredients (except the balsamic vinegar) into a large saucepan. Bring to the boil before lowering the heat and simmering for 3 minutes or so. Pop your peeled shallots into the liquid and simmer for 8-10 minutes until tender…

Now, I have a word of warning, beware of going too close to the bubbling, vinegar concoction, I learnt the hard way that if you get the vapour in your eye…it stings like hell!

Use a slotted spoon to scoop the shallots and basil out into sterilised jars (read about how to sterilise your jars here). Then whack up the heat and boil the remaining liquid rapidly for 5 minutes. Turn the heat off and stir in the balsamic vinegar. Pour the liquid over your shallots until they’re covered. Seal the jars and leave them for 3 days to get tasty! Then they’re ready to eat, but there’s no rush as they’ll keep for up to 3 months.

Leave a comment

Filed under Uncategorized

My Afternoon Tease debut in Cambridge…

This weekend was a momentous one for me…I ran my first ‘Afternoon Tease’ cake stall at the Mill Road Winter Fair in Cambridge. It was the culmination of a lot of hard work, 15 solid hours of baking, quite a few sleepless nights and endless list writing, but I managed to pull this out of the bag…

I chose to make my favourite selection of goodies that I’ve blogged over the last year and a half, here…coconut macaroonsbanana pecan fudge loaf,chocolate orange cupcakeslebkuchensticky lime and coconut drizzle loafsticky toffee cupcakeschocolate brownies.

In the calm before the storm, I nervously wondered whether the good people of Cambridge would actually buy my cakes…

I’m very chuffed to say that everything sold like proverbial ‘hot cakes’ and I was cleared out well before the end of the fair.

One of my bestsellers on the day were the Stollen Buns…

To make them you need…

500g Strong white bread flour

3tbsp light muscovado sugar

7g sachet fast-action yeast

3tsp ground mixed spice

1tsp salt

85g butter

200ml milk

1tbsp black treacle

2tbsp brandy

2 eggs

2tbsp sunflower or vegetable oil

250g mixed sultanas, raisins, peel and glace cherries (I used Sainsburys Taste the Difference Armagnac soaked fruit)

Zest of 1 orange and 1 lemon

400g marzipan

A handful of flaked almonds

For the syrup…

50g icing sugar, sifted

4tbsp hot water

This might sound like it’s going to be a long winded, tricky recipe but although you do need to set aside some time for letting it rise etc, it’s pretty low maintenance and I promise you…it’s worth it!

Mix together the flour, sugar, yeast, spice and salt in a large bowl. Rub the butter in with your finger tips until it has the consistency of crumbs and there aren’t any lumps of butter left.

The recipe I was using said to warm the milk, treacle and brandy in a saucepan, making sure it’s warm, not hot before adding 1 beaten egg and the oil. However, as I was using fruit already soaked in Armagnac, I omitted the brandy at this stage.

Add the liquid ingredients to the dry ingredients and leave to one side for 10 minutes before giving it a quick knead on a floured surface. Pop it back in the bowl, cover it and leave it to rise until it has doubled in size.

Now roll the dough out to A4 size, scatter over the dried fruits and zests and knead until they are evenly distributed through your dough. Be prepared for raisins to fling themselves liberally around your kitchen! 🙂

Roll the dough into an 50 x 15cm oblong and dampen around the edges with some water…

Roll the marzipan into a 50cm long sausage and place along the middle of your dough. Roll the dough around it and pinch the final edge to seal it so that your buns don’t unravel in the oven.

Preheat the oven to 200 degrees.

Slice the dough sausage into 14, discarding the very end pieces. Place your slices on a couple of baking sheets lined with greaseproof paper, with plenty of space between them…

Re-cover them and leave them to rise until plump and pillowy.

Beat the remaining egg with 1tbsp milk and use to glaze the buns. Finally, sprinkle them with flaked almonds and then put them in the oven for 15 minutes.

Whilst they’re cooking mix the icing sugar with hot water to make the syrup. Paint this over them as soon as you take them out of the oven…

Then make a cup of tea and then sit down an savour!

I really enjoyed being part of such a lovely event, meeting so many nice people and receiving some great comments and feedback. Cambridge hasn’t seen the last of the ‘Afternoon Tease’…I’ll be back!

Leave a comment

Filed under Uncategorized

The Afternoon Tease goes public!

I’m very excited to announce that I will be running my very first ‘Afternoon Tease’ stall at Mill Road Winter Fair on Saturday 3rd December! I’ve been busy planning, writing lists upon lists, making signs and losing sleep over what to bake…or more importantly what the good people of Cambridge will want to buy! I’m definitely going to be including some of my old faithfuls that I’ve perfected and that never seem to disappoint but I thought I’d throw something a little festive into the mix as well…and nothing says Christmas better than sweet, lightly spicy, gorgeously glazed, chewy centred lebkuchen…

They’re also surprisingly easy to make. You need…

250g plain flour

85g ground almonds

2 tsp ground ginger

1 tsp ground cinnamon

1 tsp baking powder

½ tsp bicarbonate of soda

A pinch each of ground cloves, freshly grated nutmeg and ground black pepper

200ml clear honey

85g butter

Zest of 1 lemon

All you have to do is put all of the dry ingredients into a large bowl. Then gently heat the butter and honey in a saucepan until the butter melts. Pour the sticky mixture into the dry ingredients along with the lemon zest and mix it up until it combines into a smooth dough. Don’t worry if it still looks a bit sticky, just cover it and leave it to one side to cool. One word of warning…do not underestimate just how much 200ml of honey is, I wrongly assumed that I had plenty in my cupboard and had to make a last minute dash to the shop mid-bake!

Preheat your oven to 180 degrees.

Now it’s time to get your hands dirty. Roll the dough into approx 30 smooth balls (to give you an idea, they should be about 3cm wide), then put them on a baking tray lined with greaseproof paper. You’ll need a couple of trays as your lebkuchen need room to spread out…

The recipe said to flatten them into a disc but in the time that it took me to roll the rest of the mixture into balls the first ones had settled themselves into the perfect dome shape!

Bake them for 15 minutes, then remove from the oven and transfer to a wire rack to cool. I don’t own one yet (it’s on my Christmas list) so I had to make do with leaving them on their tray.

To ice the biscuits you need…

100g icing sugar, sifted

1 egg white, beaten

Mix the icing sugar with the egg white and 1-2 tbsp water to form a smooth, runny icing. Dip the top of each of your biscuits into the icing to give it a gorgeous glaze and then leave to dry in a warm place.

Once set they’ll keep for up to a week in an airtight container.

I love lebkuchen, mostly for the fact that they’re delicately spiced and not as pungent as gingerbread. I especially loved the inclusion of black pepper in this recipe. Having said that, I think I might try adding a teaspoon more of ground ginger next time and I maybe need to make some slight tweaks to the icing, as mine wasn’t in a hurry to set!

I can, however, confirm that they actually benefited from being left overnight, the icing (eventually) set beautifully and the texture improved. In the season of excess, I think these simple biscuits are a perfect sweet treat and who wouldn’t be happy to receive a gorgeous little jar of lightly spiced Lebkuchen?

If you’re Cambridge based or are around and about on 3rd December…pop over and say hi and try one for yourself!

Leave a comment

Filed under Uncategorized